Wondering if the DreamBox 2 can house all your crafting essentials? Let's find out! Read on to lay out your plan for your DreamBox according to your craft type and workflow. You’ll also get first-hand advice from creators in our community on how the DreamBox can be customized to suit your specific needs.
1. Start with a plan: Use The DreamBox 2 Planogram
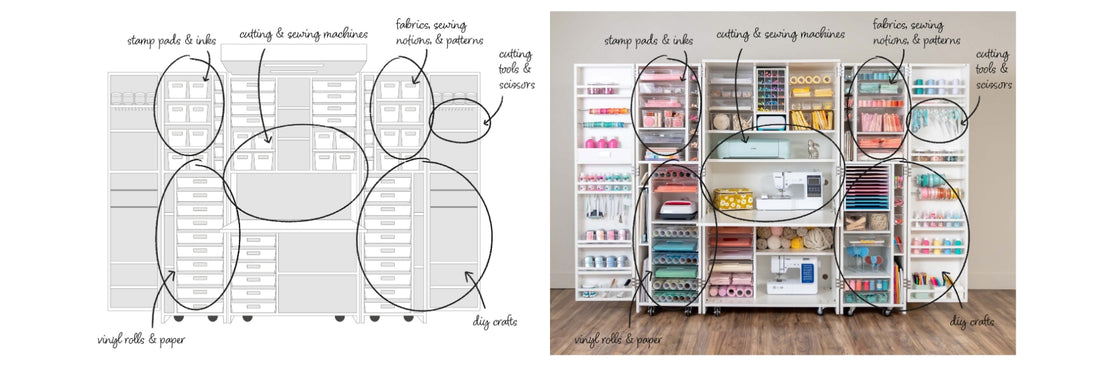
Before getting your new DreamBox, it's essential to have a plan in place. The DreamBox 2 Planogram will be your best friend for this first step. Click on the links below to download your free DreamBox 2 Planogram and start sketching out where you want your supplies to go inside your new craft space. This initial step is crucial because it helps you estimate the sections and how much stuff might fit where. Planning ahead can save you a lot of time down the road!

Choose which setup you have in mind and click below to download your Planogram:
Empty DreamBox 2
DreamBox 2 with Full Set Totes
DreamBox 2 with Half Set Totes
Not sure what the difference is between Full Set or Half Set Totes?
Click here to explore the different DreamBox 2 Tote options.
To see planograms for the DreamBox 2 with our Short Divider add-on accessory, click below:
DreamBox 2 + Short Dividers with Full Set Totes
DreamBox 2 + Short Dividers with Half Set Totes
Click here to learn more about the Short Divider add-on accessory.
2. Take inventory of your supplies
Start with what you have! The best way to figure out what will work for you is to take stock of what craft supplies already exist in your house. You might be surprised by what you find hiding in deep bins, junk drawers, or your closet. It’s important to log everything first so you can map out your supplies in your Planogram and set up zones for each of your supplies.

As you fill out your Planogram, you can start by categorizing your supplies into craft types. For instance, group all your scrapbooking supplies in one section, and all your sewing supplies on a different side. If you prefer to organize by the type of supplies you have, this might mean assigning all your fabrics in one section and all your paper in another.
3. Identify your main craft types
At this point, you might be asking, “What if I have more than one craft type?”. The best part of the DreamBox is that it’s designed for maximum customizability. It has room for all types of crafters, from scrapbookers to sewists and everything in between. Take a look through our blog posts below to see how it can work for different crafting types.
For Scrapbookers & Stampers

For scrapbookers, the DreamBox 2 offers plenty of space for paper, stickers, embellishments, and tools. Adjustable shelves and Totes can be configured to fit your specific paper sizes and crafting tools.

In the Swing Doors, your DreamBox includes hanging rods for washi tape, ribbons, and more! Stamps can be stored in multiple places, including the Large and Small InView Totes, or the Swing Doors.

If you have Cricut machines or other cutting machines, you can fit yours inside the Center Box (as seen below) for easy access, store on top of the table, or create an extra shelf above with the Machine Shelf add-on.

The options don’t end there! We have a wide range of accessories for the DreamBox 2, including a Paper Organizer for keeping your most important sheets of paper front and center. The DreamBox 2 Side Tables are a great way to expand your workspace so you can switch between your cutting machines and your other projects all in one space.

Read more about DreamBox organization tips for scrapbookers & stampers.
For Sewists & Quilters

The DreamBox 2 includes three different sizes of InView Totes and customizable shelving to accommodate fabric rolls and sewing machines. The spacious design of the DreamBox ensures you have everything at your fingertips!

To keep beads, buttons, and jewelry items separated, you can use the Notions Tray Inserts accessory. This includes 5 trays comprised of several small compartments that you can slip into your regular InView Totes.

Read more about DreamBox organization for sewists & quilters.
For Painters & Crafters

When storing paint bottles, you can organize yours inside any of your InView Totes or shelves. The Swing Doors and Jars can easily hold paintbrushes and knick-knacks, or you can store them inside the Small InView Totes.
Another option is the Tool Cubby accessory which is perfect for holding pens, markers, paintbrushes, scissors, stamps, fabric, vinyl rolls, and other artistic essentials. You can keep your creativity flowing with all your tools easily within reach.

Read more about DreamBox organization for painters & crafters.
If you think you'll need more space for extra supplies, our side furniture pairs perfectly with the DreamBox 2:

4. Divide totes and shelves into zones
Now that you’ve downloaded your Planogram, taken stock of your supplies, and identified your main craft type, you can designate zones in your DreamBox based on the workflow that suits you best. Take out your Planogram and choose which type of zones work for you, whether that’s by craft type, supplies, or both!

For more tips on how to fill out your Planogram, take a look at our blog post here!
5. Talk with creators in our community
Still have questions about how certain supplies will fit in your DreamBox? Not to worry, our Create Room Facebook Group is full of creators like you. Come say hello and talk with other creators in our community! Many of our creators hold discussions about the DreamBox 2, share advice on organizing, and post their transformation photos to celebrate their new craft spaces.
Follow Jilly’s DreamBox Transformation:
“To say this hasn't been a process would be a lie, but I already feel SO accomplished & I'm not done yet! After packing up all of my daughter's things, I shifted my stuff to the right side of the room so that I could begin building my DreamBox. Our treadmill is still in this room & I've had to maneuver around it more than I'd like.”

“I finished the interior wallpaper on the Box and began adding in all the shelves & Totes. I started loading stuff into my Box today & slowly made my way through the pile on the right. All of my photography gear is going into the closet in that room, which is blocked by the treadmill currently. So there's a pile there! I got the rest of my daughter's furniture out of the back left corner & moved my other crafting drawers that were on the right wall to the back. The now empty wall with the TV is where my desk is going. Once I get my desk in there, the treadmill gets to come out! One day at a time!”
Look Inside Lori’s DreamBox Before & Afters:
"Here are my pictures of my DreamBox 2. So very excited on getting it, now I am at a loss of what to start first of all of my projects."

With careful planning and a bit of creativity, you can easily get the most out of your new storage space and make it the perfect fit for your crafting haven!
Schedule a Creator Consultation
Consider scheduling a virtual Creator Consultation to get personalized answers to your specific questions. Our creators can guide you through the planning process and ensure that your DreamBox 2 is tailored to your unique crafting needs!